How to Create Automatic Emails
Send triggered email sequences that run on their own — welcome series, order confirmations, abandoned cart recovery, and more — using CRM Journeys in Get Shouting.
Automatic Emails vs Email Campaigns
In Get Shouting, automatic emails are always sent by a CRM Journey — not by an Email Campaign (blast). A Journey enrolls each contact when a trigger fires, then runs Send Email, Wait, and optional Condition steps on the Visual Journey Builder canvas (/email/journeys/{id}).
| Automatic emails (CRM Journey) | One-time send (Email Campaign) |
|---|---|
| Fires when a contact or store event matches the trigger | You pick audience and schedule once |
| Runs continuously while the Journey is Active | Sends once per campaign |
| Multi-step sequences with delays and branches | Single message per send |
| Best for welcome, cart recovery, post-purchase | Best for promotions and newsletters |
Before You Start
- Email sender configured — From Name and physical mailing address in CRM & Email Settings (Email DNS Setup). Activation is blocked until this is saved.
- Active paid subscription — Trial accounts can explore Journey canvases but cannot activate Journeys or deliver messages (Billing).
- Store triggers (Order Placed, Abandoned Cart, etc.) — Connect Shopify or WooCommerce with Email CRM enabled on the store connection.
- Custom Journey canvases — Creating new Journeys from scratch requires a Pro or Agency plan. All plans can configure built-in Journey templates with Set Up.
Where Journeys Live in the App
- Email → CRM Journeys in the main navigation (list view at
/email/journeys) - Campaigns → CRM Journeys tab in the Campaigns hub
- +CREATE → CRM Journey to start a new custom Journey (Pro or Agency)
Option A: Enable a Built-In Journey
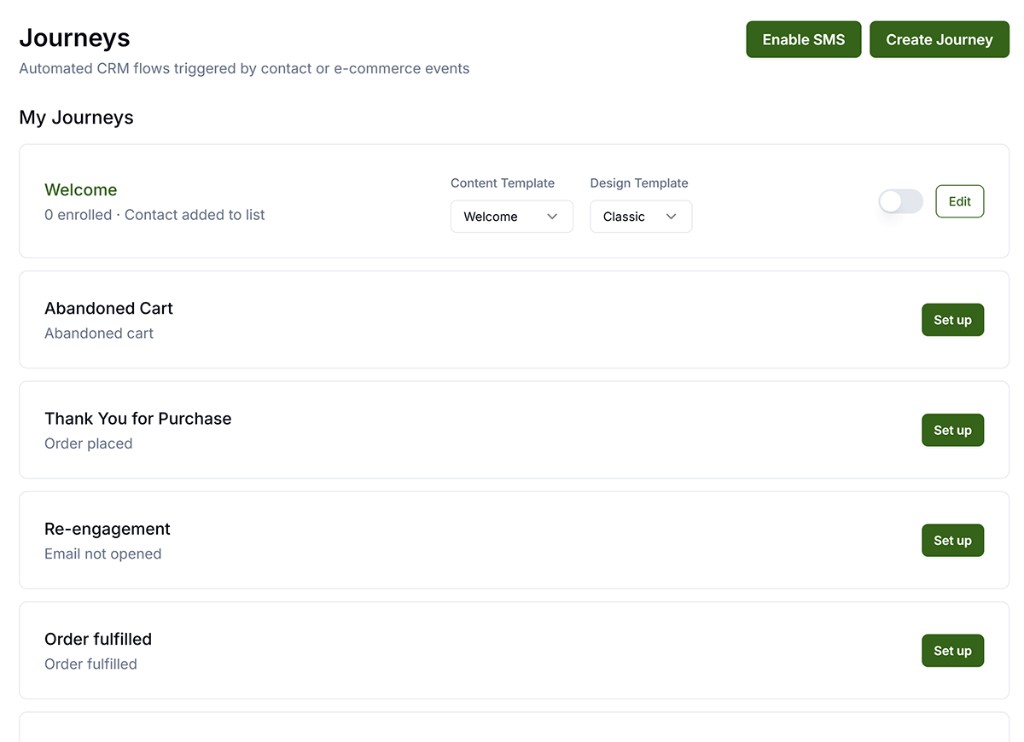
When your store or subscribe form is connected, Get Shouting lists built-in Journey templates (Welcome, Abandoned Cart, Post-Purchase, and others) on the Journeys list. Store webhooks and form events are wired automatically — you choose templates and activate.
- Open Email → CRM Journeys.
- Find the journey card (for example, Welcome or Abandoned Cart).
- Click Set Up.
- Choose a Design Template (visual frame) and Content Template (copy layout) for each Send Email step.
- Toggle the journey Active when you are ready to send.
On all plans you can assign templates to built-in journeys. Pro and Agency users can also open the canvas to edit steps, add Wait delays, or mix in SMS. See Automated CRM Journeys for the full e-commerce trigger matrix.
Option B: Create a Custom Journey (Pro or Agency)
- Click +CREATE → CRM Journey, or on the Journeys list click Create Journey.
- Enter a name, optional description, and choose a trigger (fixed after creation — see the trigger table in CRM Visual Journey Builder).
- The Visual Journey Builder opens for that Journey.
Add Automatic Email Steps
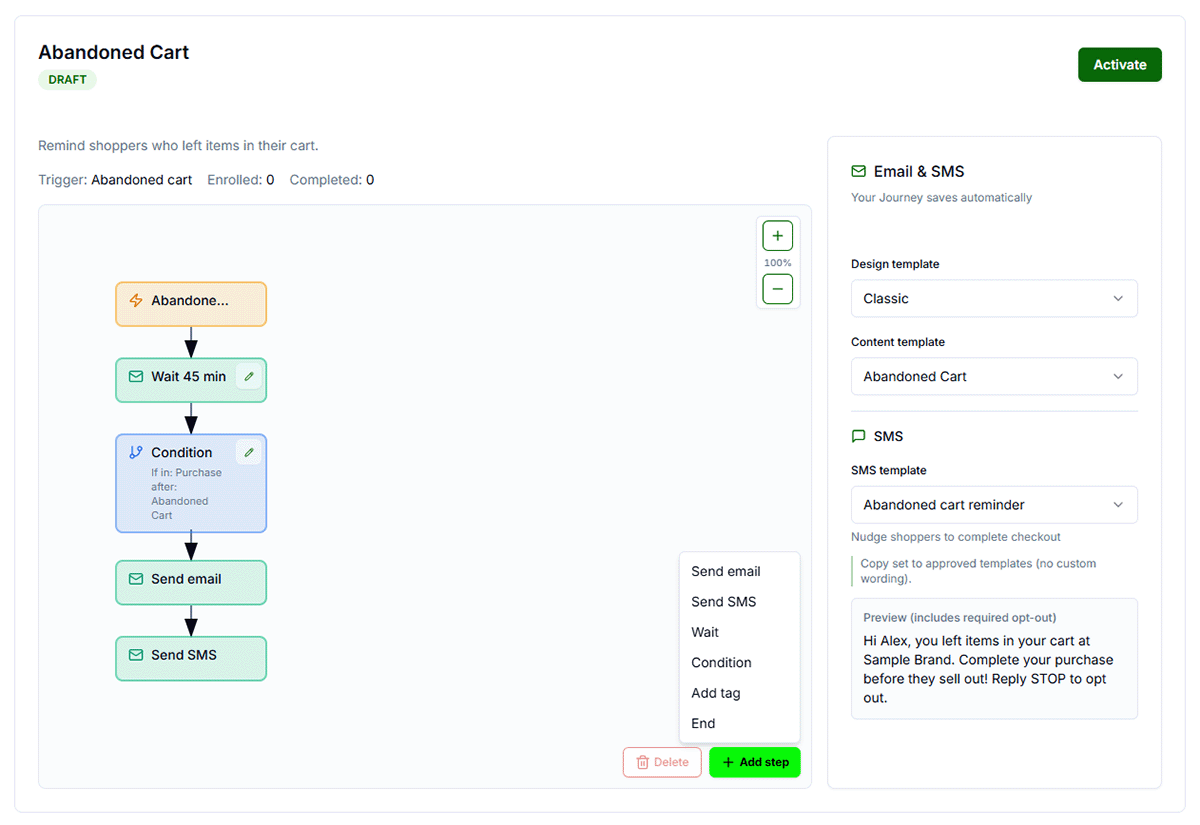
- Click Add step → Send Email.
- In the Step Editor Panel, set subject, preheader, and body (same rich editor as Email Campaigns).
- Apply a Design Template and Content Template; personalize with merge tags such as
{{firstName}},{{orderNumber}}, and{{cartUrl}}. - Add a Wait step between consecutive Send Email steps (back-to-back sends are blocked).
- End every branch with an End step. Optional: Condition, Add Tag, or Send SMS when SMS is enabled.
Full canvas reference: CRM Visual Journey Builder.
Activate Your Automatic Emails
- Confirm your email sender is complete.
- Click Activate in the Journey header. Status becomes Active; the canvas becomes read-only.
- When the trigger fires, Get Shouting creates an enrollment and advances the contact through each step. Each Send Email step counts toward your monthly send quota (500 free sends/month on all plans).
To edit a live Journey: Pause → edit the canvas → Activate again. Contacts already enrolled continue their current steps while paused; only new enrollments stop.
How It Works (Architecture)
- Trigger — Listens for events: subscribe form (Contact Added to List), Resend open/click webhooks (Email Opened / Email Clicked), Shopify webhooks, or WooCommerce plugin events when a store is connected.
- Enrollment — Each qualifying contact gets a journey enrollment record when the trigger fires.
- Step runner — Advances enrollments through Wait, Condition, Add Tag, Send Email, and Send SMS steps on the schedule you defined.
- Send Email — Renders your Design + Content templates with merge tags and sends through your configured sender identity (shared or custom domain).
Common Automatic Email Flows
| Goal | Trigger | Notes |
|---|---|---|
| Welcome series | Contact Added to List | No store required; fires on subscribe form signup |
| Order confirmation | Order Placed | Cross-platform paid-order signal (Shopify or WooCommerce) |
| Abandoned cart recovery | Abandoned Cart | Built-in 45-minute Wait before first email; use {{cartUrl}}. WooCommerce requires plugin v1.1.0+ |
| Post-purchase follow-up | Order Fulfilled or Order Completed | Add a Wait step (for example, 3 days) before review or upsell email |
| Tag-based nurture | Tag Added | Chain Journeys with Add Tag steps at the end of one flow |
Next Steps
- Email, SMS, & CRM Overview
- Automated CRM Journeys — store triggers and built-in templates
- CRM Visual Journey Builder — canvas, steps, and activation
- Email Design Templates • Email Content Templates
- Journey analytics